
The first user(s) and role(s) are created by the account owner admin. Thereafter, the user(s) created by the account owner admin can create users (and roles) within the permissions they were assigned. If you do not have the permissions you need to create a new user, contact your account owner admin.
Permissions are set at two levels: role and user. Permissions for roles typically reflect the level of responsibility associated with that position; typical role titles include customer service representative, office administrator, warehouse supervisor, or sales representative. A user can be assigned more than one role.
When it's time to add a new user, the applicable role must be in place so that it can be assigned to the new user by selecting it from the dropdown menu. If the role of interest is already in place you are "good to go." If the role is not available, create the new role first.
Permissions that can be set when creating a new user are:

This article covers:
- Finding the menu options
- Creating a user
- Editing user information
- Setting location-based user permissions
- Related articles
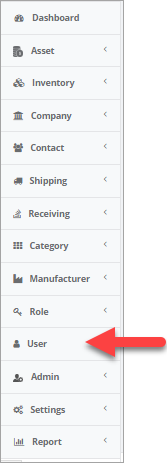
Finding the menu options
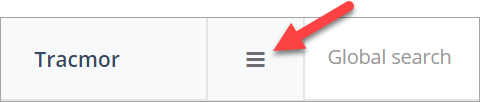
All user-related menu options are accessed from the side menu.
Note: If the side menu is not visible, click on the square to the left of Global Search at the top of the screen. Clicking on this icon allows you to show and hide the side menu.
Creating a user
Tip: Speed things up by first verifying that the role definition that will be assigned to this new user is already in place.
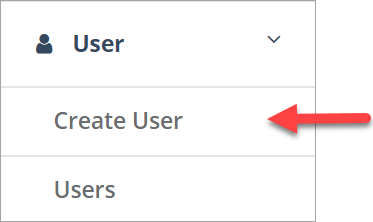
To arrive at the Create User dialog box, navigate to User>Create User.
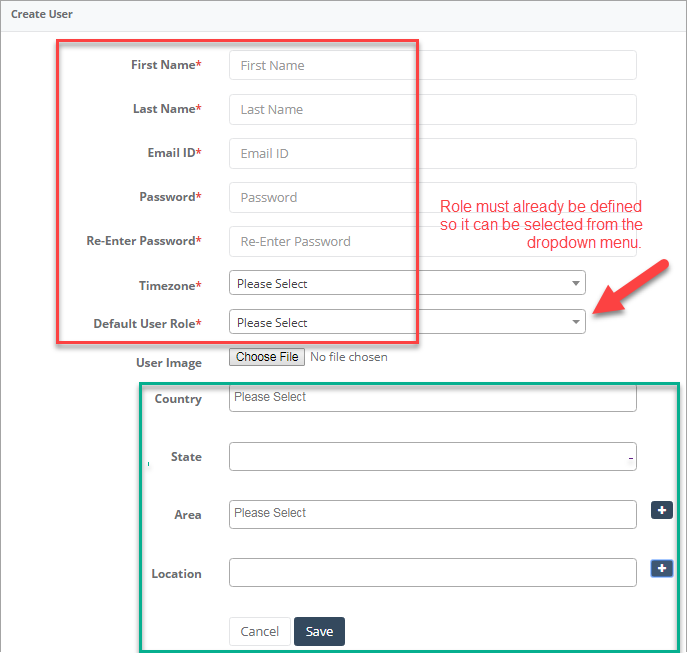
All information indicated by a red asterisk (red box below) is required and applies to the new user:
- Name: first and last
- Email ID: a user's email serves as that person's ID; it is a permanent record associated with the user name and cannot be edited. The new user verification link will be sent to this email.
- Password: the new user will use this password to verify their email address and then be able to change it
- Time zone: Select the user's applicable time zone from the dropdown menu
- Role: Select the new user's default role from the dropdown menu
Optional information:
- Image: Select an image (the new user will be able to change it)
- Permission: specify the location that this user has access to (shown in the blue box); for selection details, see below under Setting the Location
Note: You can arrive at the same dialog box by navigating to User>Users and clicking on the (blue) plus icon (see arrow below).

Once all the information is entered, click on Save to send an email invitation to the new user.
The new user activates their account by clicking on a link in the verification email.
Editing user information
Access the User List by navigating to User>Users.

If many users are already created, you can search by First Name, Last Name, Email ID, Status, and Created by, as shown in the fields under User Search (top red circle). Once you select the search criteria from the drop down menus, click on Apply Filter.
Note: The names in the user list are limited to the users you created (unless you are the account owner admin and have a complete overview).
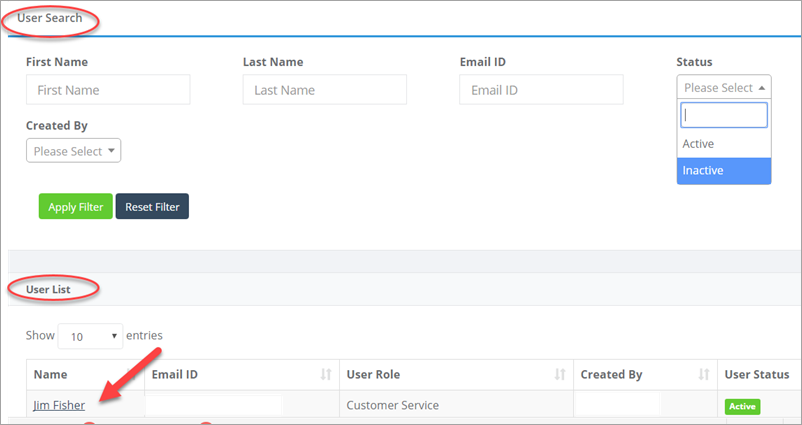
The User List, shown by the bottom red circle, lists the names of users you created (not all users), or the search results.
To edit user information, click on the Name to arrive at a page that provides these options:
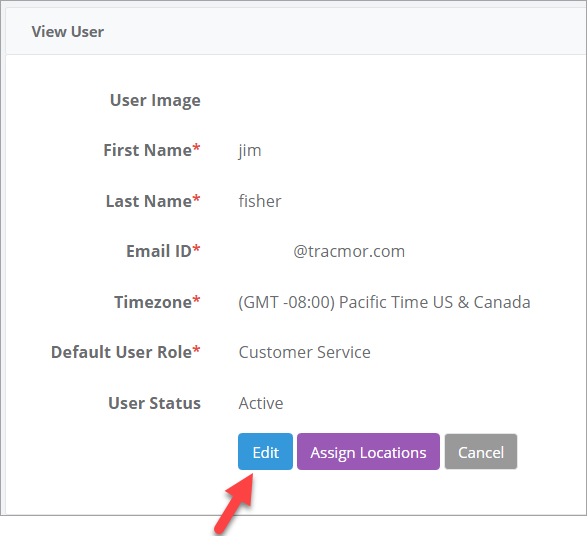
User status: Active or In-active
You can assign a new default role or change the user's status, as shown in the circled area below:
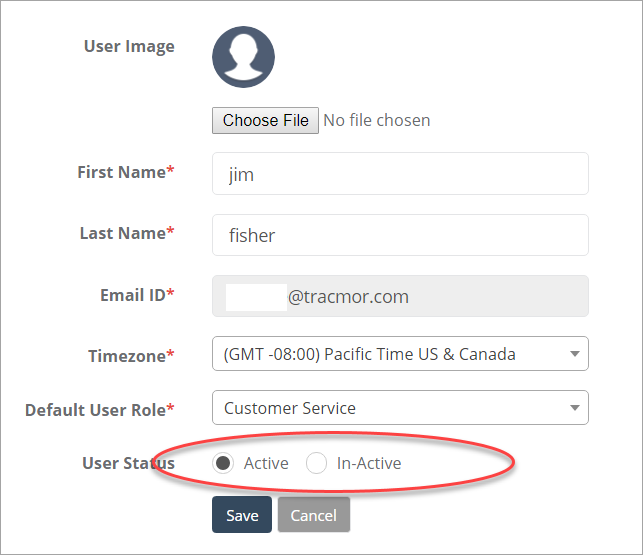
Once you have made your changes, be sure to click on Save (or Cancel).
Setting location-based user permissions
User permissions are controlled at two levels:
- Role-base permissions allow you to associate roles with access to information for assets and inventory and the transactions associated with them, as described in What do I need to know about roles?
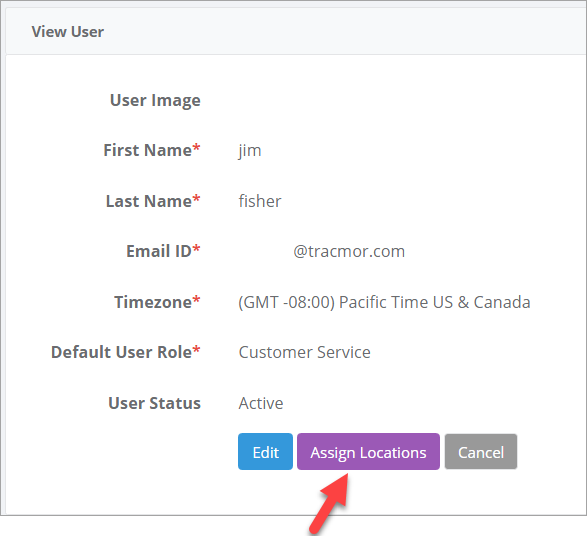
- User-based permissions allow you to associate users with locations. Set location-based permissions when you create the new user, or edit the user information as follows.
Navigate to this dialog box via User>Users then click on the name from the User List, then click on Assign Locations:
Setting the Location
The Location is user defined as follows:
- Country: Select from the dropdown menu of countries provided by Tracmor
- State: If the location is not in North America (US and Canada), add a State (or state equivalent) so it can be selected from the dropdown menu
- Area: select from previously defined areas from the dropdown menu, or add a new area "on the fly" by clicking the (blue) plus icon (about areas)
- Location: select from previously defined locations from the dropdown menu, or add a new location"on the fly" by clicking the (blue) plus icon (about locations)
- Role: A user role must be defined for each location defined for this user
Once all parameters are entered, click on Add (red arrow). You can add multiple locations for this user, as listed under Selected Location Based Role. Once the user's location-based profile is complete, click on Save.

To remove a location based role for this user, click on the (red) trash icon to the right of the Role.
Related articles
What do I need to know about roles?
What do I need to know about states?
What do I need to know about areas?
What do I need to know about locations?

1 Comments