
Welcome new account owners and users with an admin role! Let's start out by clarifying the difference between the two types of admins:
- Account owner admin. The account owner admin is the person who initiated the Tracmor account. The account owner admin is the only user with access to every menu and who maintains an overview of all user information and role definitions.
- Role-defined admin. If the account owner admin created a role for you with administrator permissions, your role may still be limited by the role definition; if you need permissions that are described below but are unavailable to you, discuss your role with your account owner admin.
This article walks you through the "first things first" steps that an admin will want to know about and do, such as uploading a company logo and personal image, specifying global settings, and adding users.
Note: If this is the first time you are using Tracmor, take a quick tour of the menus before getting started.
- Personalizing your account
- Setting "admin only" global settings
- Adding new users
- What's next?
- Related Articles
Personalizing your account
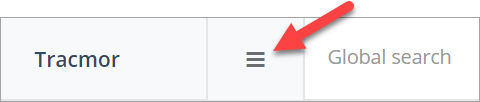
The upper left corner is reserved for your company's identity and your name and role. Clicking on your role (Admin) will enable you to create your profile, change your password, change your plan, and log out.

Tip: If this menu is not visible, click on the icon with three bars at the upper left hand corner — it toggles between showing and hiding the side menu.
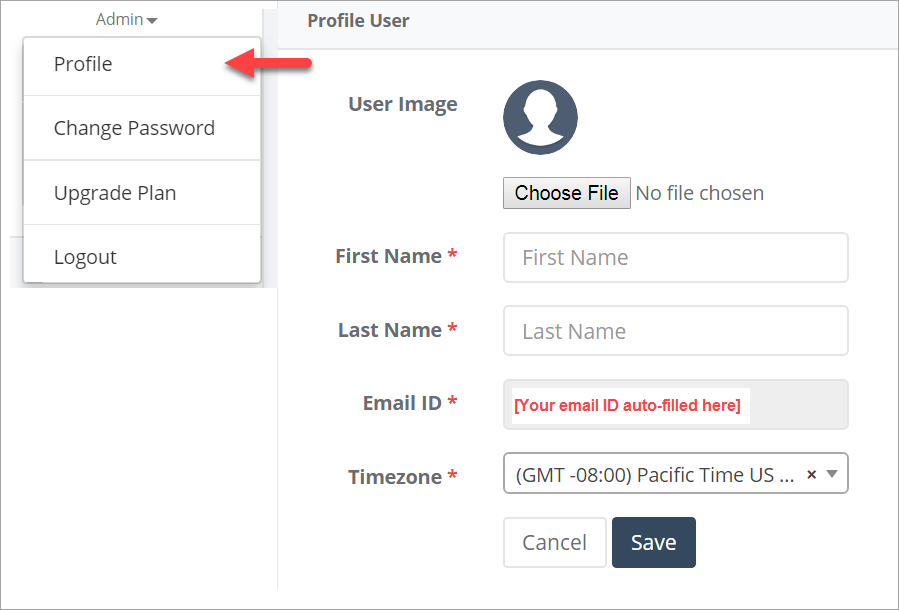
Creating your profile
- Click on Profile to enter information about you.
- Optional: Upload an image by clicking on Choose File to browse for an image, and select it by clicking Open. The image will appear in the upper right hand corner of the screen once uploaded.
- Entering your first and last name is required.
- Note: your email ID is auto-filled and cannot be changed.
- Select your timezone from the drop down menu.
- Click Save to enter all values and upload the optional image.
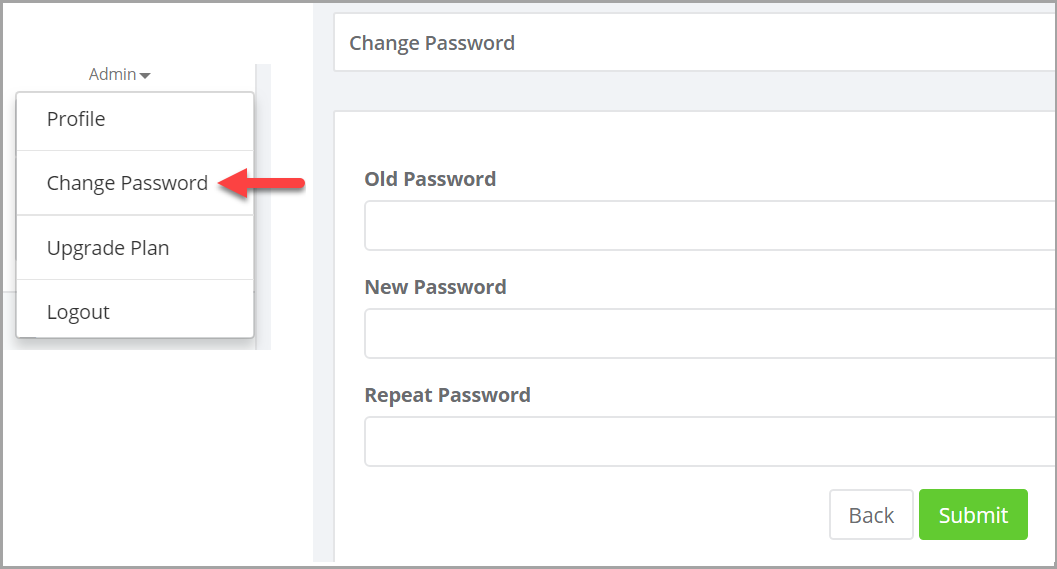
Changing your password
- Your initial password was sent to you in the email that confirmed your subscription. To change your password, click on Change Password.
- Enter the old password, a different new password, and then enter the new password a second time.
- Click on Submit to make the change.
Upgrading your plan
The account owner admin is the only user with the option to Upgrade Plan. Clicking on it takes you to the Customer Portal Login.

Note: The password for the Customer Portal is separate from the password you use to login to Tracmor.

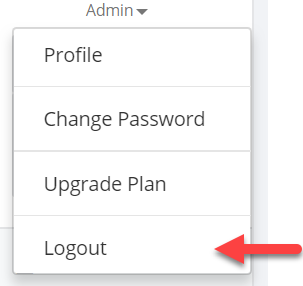
Logging out
Logging out when you are not using Tracmor is recommended, since entries made with your login are tracked and logged as having been made by you.
There are two ways to logout: Click on the red arrow in the upper right hand corner ![]() or click on Logout.
or click on Logout.
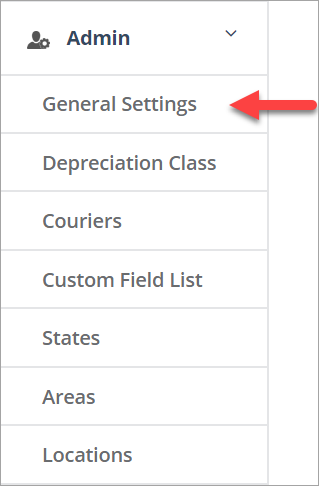
Setting "admin only" global settings
All users with admin permissions have access to General Settings, which provides controls for four global settings: Admin, Asset, Shipping/Receiving, and Check In/Out. Click on Admin>General Settings (side menu, near the bottom) to set these values, as described below.
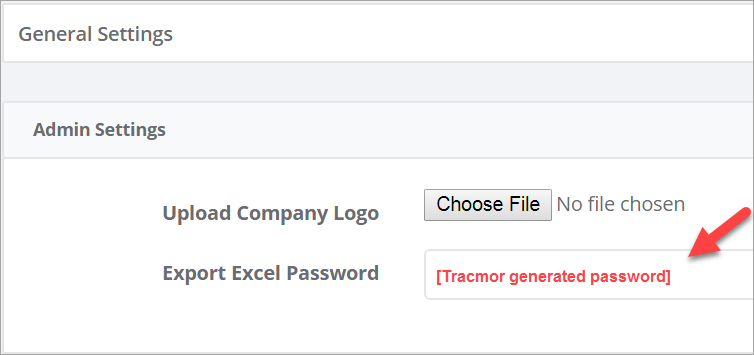
1. Admin Settings. Optional: upload your company's logo by clicking on Choose File to browse for and select an image file. Once you click on the file, the file name will appear instead of [No file chosen].
Note: the file must be less than 100 kb.
![]()
Once you click on Save, (at the bottom of the dialog box), your logo will be visible in the top left corner.
![]()
Important: The Export Excel Password is assigned by Tracmor, and all users with admin permissions have access to the same password. The password provides a security measure to ensure that exported files remain true to the information that was entered into Tracmor.
2. Asset Settings
If you plan to use Tracmor's built-in depreciation calculation functions, be sure to check the blue check box to "Enable Depreciation."
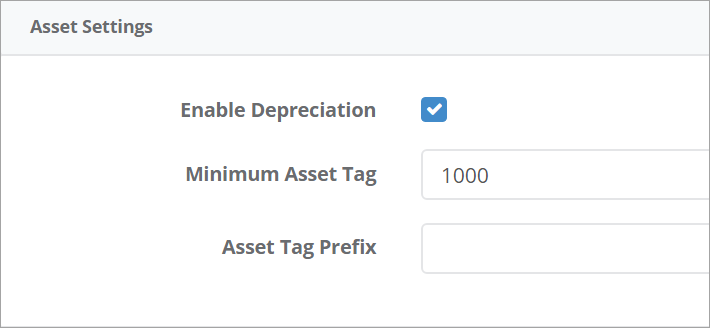
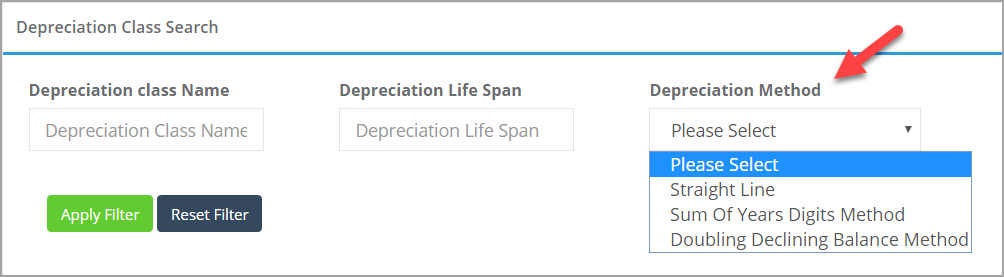
The three depreciation methods available for creating Depreciation classes are: Straight Line, Sum of Years Digits Method, and Doubling Declining Balance Method. For details, see What do I need to know about depreciation classes?
In Asset Settings you can also set the Minimum Asset Tag and Asset Tag Prefix, which applies only to auto-generated asset tags; you can still designate any Asset Tag number when you enter it manually (that is, you do not click on the auto-generate asset tag check box when creating an asset record).
Note: The Asset Tag Prefix is limited to letters and specific special characters.
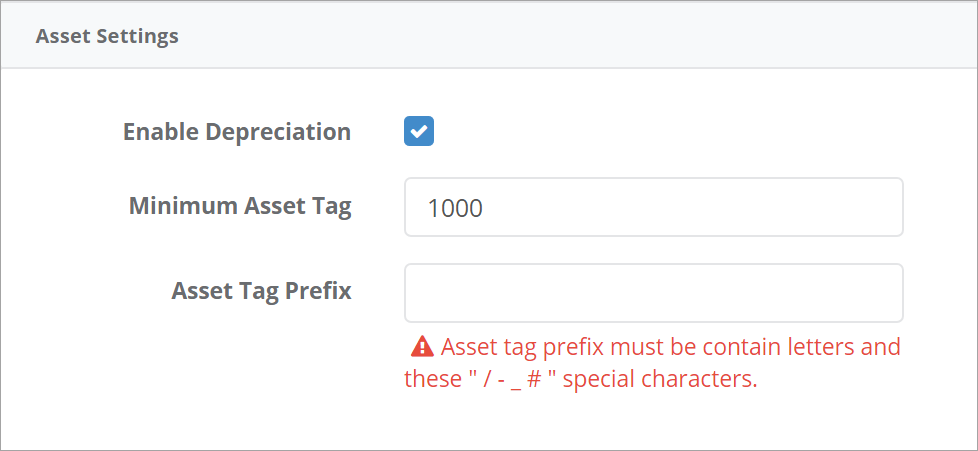
When you have entered all values, click on Save to activate your settings.
3. Shipping/Receiving Settings
If some of your shipping and receiving transactions originate from one place, or involve only one contact, and/or originate from one shipping address name, you can speed things up by pre-populating certain fields.
To select options for items in dropdown menus, you will need to "create" the companies and contacts first. This applies to these options:
- Default Shipping Company
- Default Shipping Contact
- Default Shipping Address Name
- Default Receiving Company
- Default Receiving Contact
- Default Receiving Address Name
These options are enabled by clicking the check box next to the selected item(s)
- Receive to Last Location. Enable this option to receive an item to the location from where it was shipped; this is especially useful for "returns" because the originating location will be one of the options in the drop down menu.
- Custom Shipment Numbers. Enable this option to create custom shipment numbers; if you leave this check box blank, Tracmor will auto-generate a sequential shipment number for every shipment that is scheduled. (All shipping information, such as sender, receiver, packing list, ship date, and notes is recorded under the shipment number.)
- Custom Receipt Numbers. Enable this option if you wish to create custom receipt numbers. If you do not enable this, Tracmor will auto-generate a sequential receipt number for every receipt that is scheduled.
This option enables you to add text to your packing list:
- Packing List Terms. Enter any text that you want to appear on every packing list, such as your return policy.
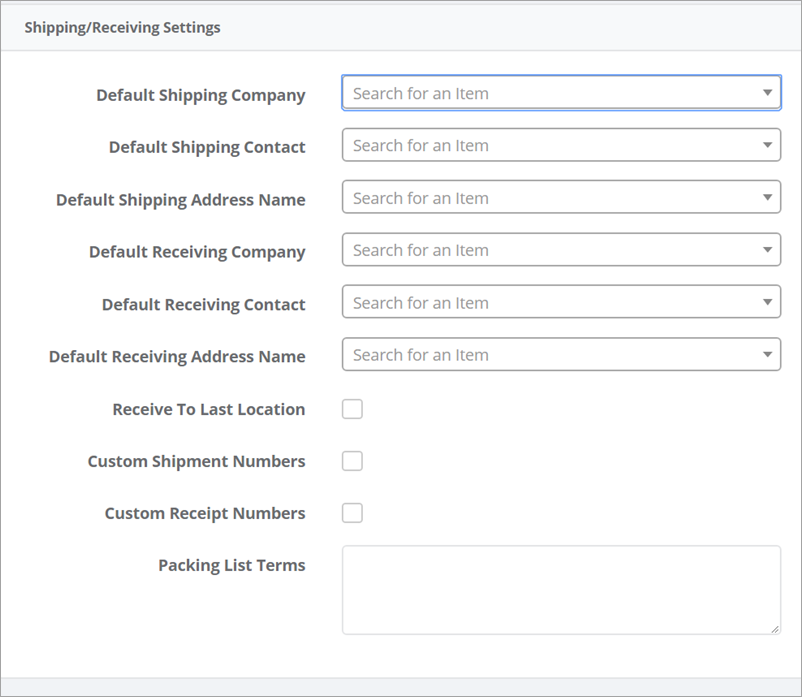
When you have made all changes, be sure to click on Save to activate your settings.
4. Check In/Out Settings.
These global settings allow you to specify permissions and type of information that is required.
- By default, users can only check out assets for themselves, but permissions can be expanded to other users and contacts:
- Check Out to Other Users. Check this box to allow users to check assets out to other users if those permissions are enabled in their role definition. This permission is essential for anyone in a coordinating role.
- Check Out to Contacts. Check this box to enable users to check assets out to contacts if those permissions are enabled in their role definition. This permission is useful for demos and rental items, for instance.
- Due Date Required. Checking this box makes a due date a required field.
- Reason Required. Checking this box makes a note about the reason for the check out a required field.
- Default Check Out Period. The default check out period is 24 hours. To set a different period, enter the number of hours. For instance, enter 168 if the default check out period is one week (24 hours x 7 days per week =168 hours per week.)
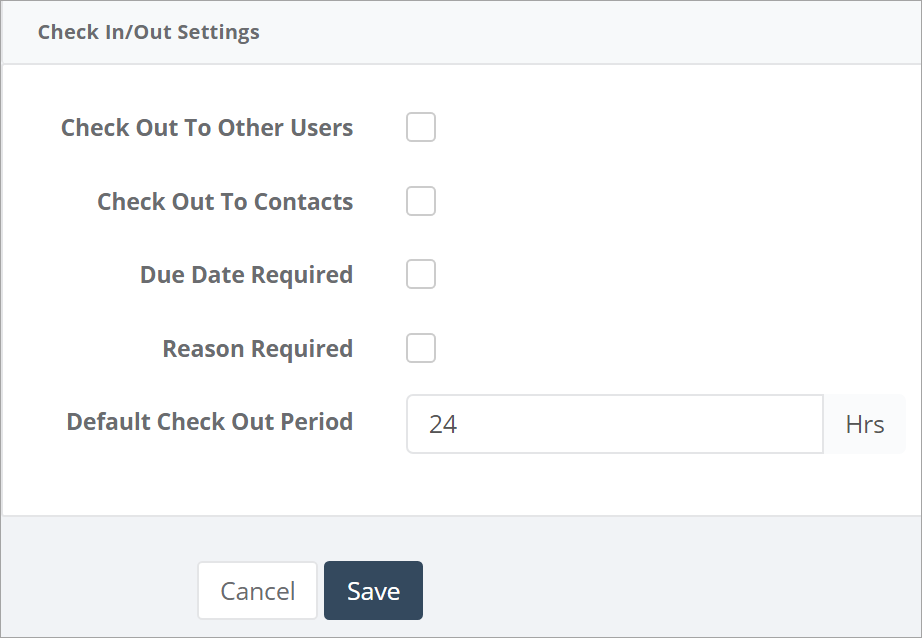
When you have made all changes, click on Save to activate your settings.
Adding new users
Before you can add one or more new users, you must create the applicable user role(s). Each role definition specifies permissions that the user creating the role defines.
Note: The account owner admin is the only one with an overview of all users and all roles. Users with admin permissions can create new users within the permissions set by the account owner admin, but are unable to see users that have already been created by others.
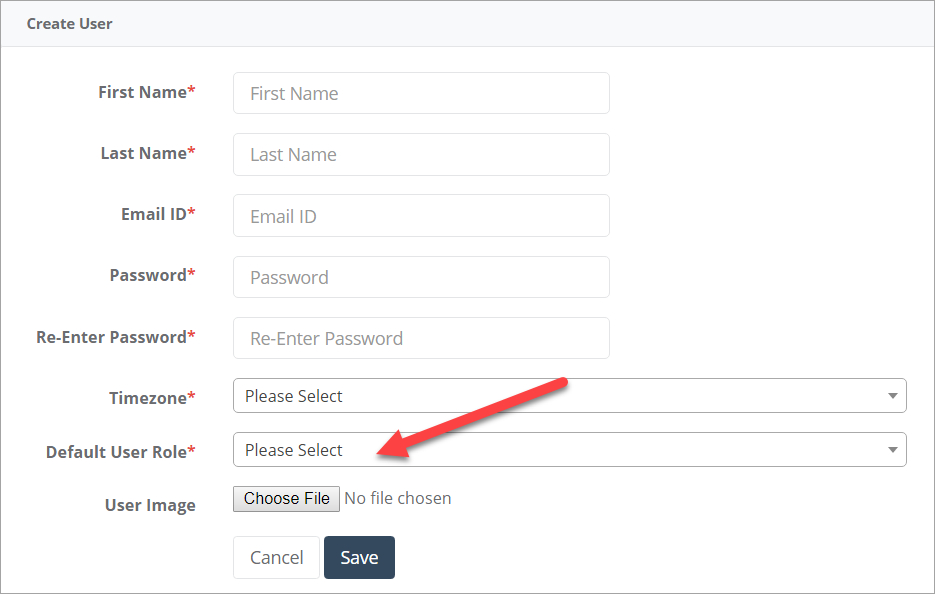
Once the Default User Role has been defined so that it can be selected, it's easy to add a new user. Provide the information for each required field: First Name, Last Name, Email ID, Password (your choice), Re-Enter Password, select the user's timezone, and this is optional — choose a User Image file to upload.
Once all required information is entered, click on Save to send an email to your new user. The new user email contains a link that activates their user account. The activated users you created are listed under User>Users. (Only the account owner admin can see all activated users.)
What's next?
As an admin, your first steps involved:
- Customizing your account
- Specifying global settings
- Creating roles and users, as needed
Once these fundamentals are in place, you and the users you created can start building your organization's asset tracking system. A good place to start is: Building the Foundation Quickly - Import Overview.
Related Articles
What do I need to know about roles?
What do I need to know about users?
What do I need to know about companies?
What do I need to know about contacts?
Building the Foundation Quickly - Import Overview
0 Comments